Focusing
 Not available nor applicable with SkyGuide
Before start focusing, just take a look at all focusing settings that are grouped in the following focusing group box:
 Excepted for the stack size all other settings can be modified while guiding.
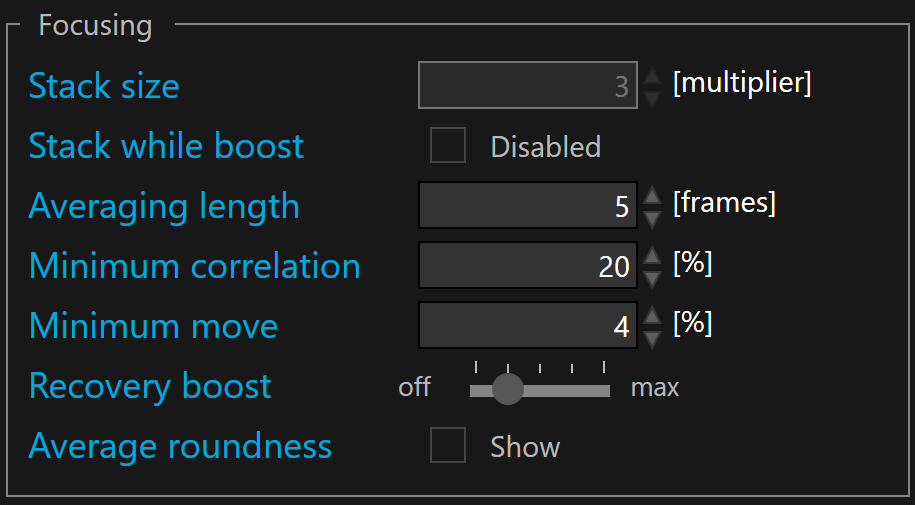
 The stack size is defined in frames. By default the stack size is set to 1 frame. A stack size >1 allows to stack many full (or sub) guider frames before processing them for auto-focus. Since focus shifts over time are usually slow this implies a much lower correction rate than auto-guiding. Therefore stacking guider frame for focusing purpose boosts the SNR for an accurate auto-focus.
Averaging length is defined in frames. By default the averaging length is set to 5 frames.
The lower this number of frame the faster the auto-focus react to any focus change (relative roundness changes).
If auto-focus seems erratic, with maybe oscillations, you may consider increasing this value, specially under seeing limited conditions.
There is usually no rush to correct the focus.
Minimum correlation allows to define the minimum value before suspending guiding. We recommend 60%.
 This minimum allows to automatically suspend the focusing, for instance, when a cloud is passing through the guider camera field.
When correlation is below the minimum, a red cross is displayed on the HUD
Minimum move sets a lower limit as a percentage of the relative roudness value for sending correction to the focuser. If the relative roundness is lower than this minimum move, the correction will not be sent. By default the minimum move is set to 1%
Minimum move cannot be disabled. The suitable values are between 1% and 100%
Average roundness checkbox allows the use of the average absolute and relative roundness for the HUD based GUI and the plots, otherwise the current values are displayed.
Start focusing
Once the guider frame acquisition has started, auto-focusing can be started, if it was calibrated at least once before.
To start focusing, click the  button.
If the focuser is not calibrated the start focusing button is disabled.
The check box at left side of the button allows enabling/disabling the start guiding operation automatically at the same time one starts exposing with the guider (SKG acquisition loop). By default it is disabled.
Stop focusing
To stop focusing, you can either click  or
or  or
or  buttons.
Stopping the guider exposure or disconnecting the instrument will stop all the loops.
Stopping focusing only suspend auto-focusing but the loops are still running.
Recovery boost
This function allows to temporarily increase the speed of the auto-focus when the relative error is outside the critical focus zone (CFZ). It works by lowering the averaging length by a user defined factor.

Recovery boost slider is divided in 5 tick mark. From left to right, the first tick at left allows to switch off the recovery boost, and the next ones till maximum allows to define how fast the auto-focus will move back within the CFZ.

Each tick mark correspond to a divider for the averaging length. You can choose among 4x, 9x,16x, 25x. At max this means that the averaging constant is divided by 25.
It works only when the recovery boost is not off and when the relative roundness is above the critical focus zone (CFZ)
Stack while boost is an option that allow to do not stack frame when the auto-focus is in recovery boost state.
Stacking frames is good mean to make the auto-focus more accurate and more steady than using a single guider frame but it takes also more time between each focuser move and of course more time to refocus. In this situation, the stack is counter productive when the focuser is outside the CFZ because it takes more time than using every guider frame. To use every guider frame, you can disable the stack while boost.
If the recovery boost is overshooting CFA, we recommend to lower the recovery boost (move slider to left). To avoid overshooting, you can also enable the stack and play around the stack size or lower the system gain (Ks).