Introduction to Astrophotography
“A journey of a thousand miles begins with a single step.” -Laozi
What is astronomy?
At its most basic definition, astronomy is the study of celestial objects. While some pursue careers in astronomy and astrophysics (the study of the origin of celestial objects), countless others consider astronomy to be a hobby.
What equipment is required for astronomy?
In order to view the stars, all you need is a lens to collect light and bring it to focus. By this definition, you already have what you need: your eyes! If you desire to view celestial objects in greater detail, you will need a telescope, binoculars, or a camera with zoom capability. Keep in mind, however, that as the magnification of the object(s) you are viewing is increased, the area of sky you are able to see (called the Field of View, or FOV), will decrease.
How does astrophotography differ from ‘standard’ visual astronomy?
To view the moon, planets, and stars ‘close’ to earth requires the purchase (or do it yourself fabrication, if you are so inclined) of a telescope and mount. While making your own telescope does take some time, purchasing one and pointing it up at the night sky can afford some spectacular views with minimal effort.
Astrophotography, on the other hand, requires patience. Conceptually, astrophotography is easy to understand: you use a lens and recording material (e.g., film or a CCD/CMOS chip) to take pictures of celestial objects.
What are the benefits of astrophotography compared to visual astronomy?
Most deep space objects (DSOs) are impossible to see with the naked eye, even through a telescope. The ones that you can see this way will appear only in black and white. The human eye is not capable of perceiving color at low light intensity (e.g., when it is night, all cats are gray). These same DSOs, however, become visible when many long exposure photographs are stacked on a computer.
Astrophotography affords you access to parts of the night sky that your eyes could not otherwise see (as well as giving you some amazing memories and pictures to show your friends).
Is it possible to do astrophotography in light-polluted areas?
Yes. Some objects in space have a significant amount of radiated energy in specific wavelengths (e.g., H-alpha, Oxygen, Sulfur, etc…). It is possible to capture only those wavelengths through the use of specialized filters (e.g., narrow band, NIR, UV, light pollution reduction, etc…).
The filters only allow specific part(s) of the light spectrum to hit the imager (e.g., DSLR, CCD chip). By performing narrow band imaging, as it is called, astrophotographers can obtain good images in light-polluted areas.
What are the difficulties of astrophotography compared to visual astronomy?
There is a lot to learn! If you love learning new things, are patient, and enjoy working through challenges, then chances are that you are well suited for astrophotography. Also, beginners may be disappointed to find out that the beautiful colorful images of distant celestial bodies are digitally enhanced.
What are the basic pieces of equipment that are needed to take good quality astrophotos?
It is possible to take photos of near objects (e.g., planets and the moon) with only a DSLR (Digital Single Lens Reflex), a telescope, and a mount. You can mount the camera over the eyepiece and take pictures. This is referred to as ‘afocal’ photography. If you want to image deep sky objects, however, you will need an entry level telescope (such as an SCT) and mount, along with a DSLR camera. You will also need to stay on target during the imaging session because the exposure time will be very long (unlike daytime photography, when there is plenty of light, at night every bit of light is important). The best way to stay on target is by using some type of autoguiding system. Without autoguiding the telescope during imaging, the quality of your photos will be poor.
Why is it necessary to autoguide to obtain crisp images of DSOs?
Tracking of the DSO must be accurate within a fraction of an arc-second. This is a very small amount of tolerable error. To put it in terms of your telescope setup, more than a few microns (a micron is 1/400,000th of an inch) of drifting will lead to poor images.
Why won’t the telescope and mount stay on target themselves?
A few microns is a VERY small amount of movement. Even with a $30,000 mount, you are going to experience some tracking error, which comes from several sources.
What are some sources of tracking error?
Polar mis-alignment of the telescope, mount mechanical errors (e.g., backlash from the gears moving the mount and periodic error from the gear asymmetry), atmospheric refraction, flexure, telescope mirror motions, and more.
Watch the auto-guiding introduction video:
Before the On-Axis Guider (ONAG), how was autoguiding accomplished?
The most popular way was to use a separate telescope (called a guide telescope) mounted to the main telescope which was focused on a guide star. A CCD camera on this guide telescope sends information to a computer about the position of the guide star. When the star drifts, the computer sends adjustment signals to the mount to correct the position. This is referred to as closed loop control.
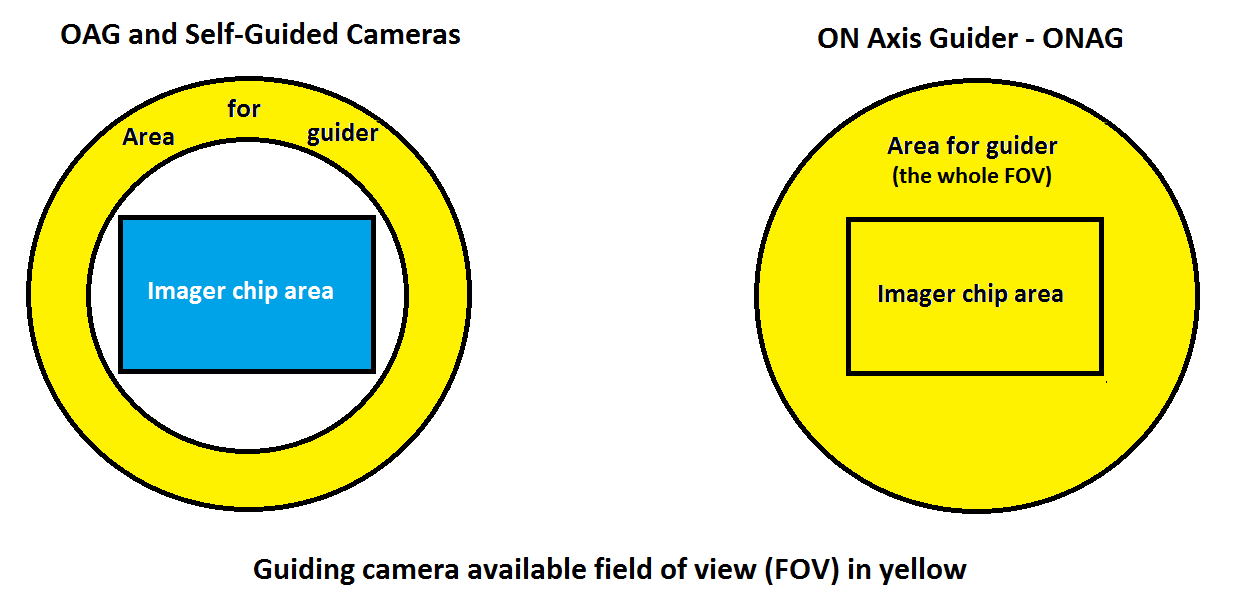
Another method is called Off-Axis Guiding (OAG). Here, a device with a small prism uses some of the main telescope’s field of view to find and track a guide star. However, since this technique shares the same telescope and optical path for both the imaging and auto-guiding cameras, the guide star must be located off-axis (some time quite far off axis), outside the field of view of the imager.
A third method is the self-guided camera. The self-guided camera is two cameras in one. There are two ‘chips’ inside the device used to capture light. The larger chip inside is used for taking the picture, and the smaller one is used to autoguide. It is basically an off-axis guiding approach.
How does the ONAG work?
The ONAG has a special mirror inside of it which reflects all of the visible light from the telescope to the imaging camera and passes all of the infrared light (which is useless for imaging purposes) to the guide camera for autoguiding. Check out the testimonials page for examples of how the ONAG has improved image quality for many astrophotographers!

What is the benefit of the ONAG over using a guide telescope?
For one, there is no need to buy a separate guide telescope if using the ONAG. In addition to that, there are still errors in guiding due to the flexure between the guide telescope and the main telescope. Keeping the two optical axes aligned within a fraction of an arc-second is usually a significant challenge. In addition to this, a guide scope will also add a significant extra load to the mount.
What is the benefit of the ONAG over Off-Axis Guiding?
Off-axis guiding is a good solution in terms of eliminating the flexure problem encountered with a guide telescope. The downside of OAG technology is that you only have a small area of the telescope’s light in which to find a guide star. The prism is small and must be placed off-axis to avoid casting any shadow on the main imaging camera (the bigger the imaging chip, the farther off-axis the guider camera must be). In addition to this, another source of concern when using an OAG is the optical off-axis aberration, which could dramatically distort the guide star (e.g., coma). The yellow shaded region on the left represents the area to find a guide star using the OAG, and the yellow shaded region on the right represents the area to find a guide start using the ONAG. You can see the difference!
Also the ONAG foes not require rotating the imager and OAG to find a suitable guide star, this allows reusing the reference flat frames over and over again.
What is the benefit of the ONAG over the self-guided camera?
The self guided camera is an expensive solution. In many cases it is more expensive than the ONAG and a DSLR with a guide camera. And because it is an all-in-one packaged solution, if you already have a camera (e.g., DSLR), it cannot be used. This means that you will pay more money for something you already own. Additionally, there is still the problem of finding a guide star. The guiding chip in self-guided cameras is small (just like the prism on Off Axis Guiders is small), and the area of the sky which can be used to find a guide star with it pales in comparison to the ONAG.
Is tracking a DSO the only challenge to imaging it?
No! In addition to keeping the telescope trained on the DSO, the object also must be kept in focus for the images to be good. This is a two part problem. The first part is tracking. This is the domain of the ONAG. The second part is staying in focus. This is the domain of SharpLock, the only program of its kind.
What is SharpLock?
SharpLock is software which accomplishes real time focusing correction using infrared light coming from the ONAG. (SharpLock only works with the ONAG technology). When light passes through the beam splitting mirror of the ONAG, a slight astigmatism is created. This affects only the guiding camera. The imaging camera receives starlight reflected from the ONAG’s mirror. The SharpLock software uses information contained in this astigmatism to determine whether the telescope is in focus or out of focus. Advanced algorithms analyze and send these corrections in real time to the focuser, (as opposed to the current practice of periodically refocusing every thirty minutes or so), SharpLock is able to save you time.
How much time does SharpLock save?
When imaging a DSO, every minute of dark sky must be used. It is not a good idea to waste good seeing conditions refocusing the telescope every thirty minutes. It was experimentally determined that SharpLock saves 27% of time by eliminating the wasted refocusing time (see our experiment page for a detailed description of how this was determined).
What types of telescopes are suitable for astrophotography?
Any type of telescope can be used for astrophotography. However, some telescope designs tend to perform better for astrophotography than others. In all cases, the larger the aperture (diameter of the main mirror or main lens) the better. There are two main categories of telescopes: ones that use mirrors to reflect light (reflectors) and ones that use lenses to bend light (refractors). Reflectors are more popular because quality lenses are more expensive to make than quality mirrors.
Schmidt-Cassegrain telescopes (SCT) offer a good compromise between astrophotography use and visual astronomy use. They feature relatively large aperture in a compact body. They are portable and versatile telescopes.
There are also telescopes optimized for astrophotography, known as astrographs. Ritchey Chretien telescopes (RCT) are the most common design (the Hubble space telescope is an RCT). The drawback with RCT scopes is that they are expensive due to a more complex optical design.
Newtonian telescopes feature a much more simple design. They are sometimes used for astrophotography, but they typically suffer from a limited back focus. This may limit the type of imaging equipment you could use with them. Improved Newtonian astrographs which overcome this limitation are now on the market.
The telescopes discussed above are all reflector designs. This is typically the technology of choice for large apertures (above 4” to 5”). Most reflector telescopes would need some field corrector (a piece of optic made using a few lenses) to flatten the telescope focal plane for the cameras. This is not typically requirement of visual observations, therefore field correctors (FC), and focal reducers (FR) including field curvature correction, are added for astrophotography.
Depending of the angular size of the DSO you may want to use a refractor telescope (mirrors are replaced with lenses). Large objects, such as the Andromeda galaxy, require a large FOV which is not available on most reflector designs.
What types of cameras are suitable for astrophotography?
SLR and DSLR cameras are commonly used for astrophotography. The latter is much more common these days thanks to modern software and digital imaging processing. DSLR cameras are suitable for every day use and astrophotography.
Specialized astronomical cameras offer even more capabilities. They are optimized to gather most of the light coming from the target, and their chip (CCD) are actively cooled down, typically 30C to 40C degrees below ambient temperature. This cooling decreases the noise floor in the image dramatically, thereby making long exposures possible.
In addition to the CCD chip, the use of associated filter wheels offers more flexibility. As mentioned previously, narrow band imaging is useful in light-polluted areas to capture images of DSOs. The Hydrogen-alpha band is quite popular for nebulas. Science imaging almost always uses special filters, and therefore requires a filter wheel. Filter wheels could be either integrated in the camera or external. In any case the astronomical camera would use a black-white (monochrome) chip (sensor).
What types of mounts are suitable for astrophotography?
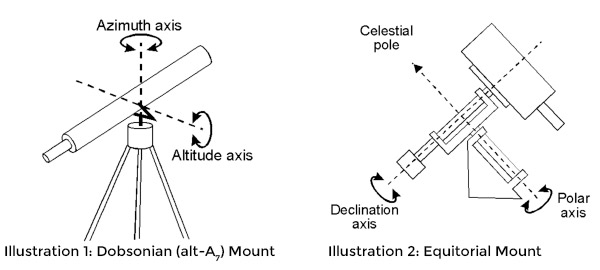 There are two main types of mounts: Altitude-Azimuth (a.k.a. Dobsonian) and Equatorial. Equatorial mounts are aligned with the polar axis of the earth. They are the most common for astrophotography, because tracking a star requires rotation about the polar axis alone. They are capable of viewing the whole night sky by rotating on the declination axis as the first figure shows (from https://moreheadplanetarium.org).
Alt-Az mounts are not polar aligned, so tracking requires rotation on two axes. Their motion is easy to understand, however, so they are a good choice for beginners. Perhaps the most common telescope and mount combination is a Newtonian reflector on a Dobsonian mount.
Most of the mid-range mounts are computerized and can be connected to a PC. German equatorial mounts (GEM) are the most common ones for astrophotography. Fork equatorial mounts can be used as well, but they require a de-rotator device, since the scope FOV is rotating during the length of an exposure.
The key elements for an astrophotography mount are its load capability and its periodic error (PE). For load capacity, as a general rule your mount’s maximum load should be about twice the amount of the weight of your telescope, camera, and guider. For periodic error, most modern mounts offers a PE compensation feature (PEC) which will drastically reduce the PE. However, left over PE and other short term mechanical noise (below few seconds) may become the ultimate limit for doing astrophotography. Longer term mechanical drift and mount alignment are easily solved with auto-guiding and our ONAG.
More Information:
Guiding with near infrared (NIR)
The ONAG® uses a dichroic beam splitter (BS). The near infrared (NIR) light goes through the BS and can be used by your guider.
NIR guiding reduces seeing effects for tracking (see below for further information)
Most stars radiate a lot of energy in NIR. The starlight spectrum (power density versus wavelength) is given by the black body radiation theory. In short the spectrum of a black body, like a star, can be totally defined from its temperature (at equilibrium).
On axis guiding – how does an ONAG work?
The ONAG uses a new, innovative and unique, patent pending technology from Innovations Foresight. Our ONAG has a special dichroic beam splitter (DBS) which is also known as “cold” mirror inside of it. This is basically an inferential filter.
The ONAG’s DBS reflects the visible light from the telescope to the imaging camera and passes the near infrared (NIR) light, which is usually useless for imaging purposes anyway, to the guiding camera for auto-guiding.
How much guiding error is too much?
Guiding errors are inevitable, however they can be reduced to a minimum with the correct guiding hardware and strategy.
Although our ONAG® goes a long way for achieving very low guiding error, most people do not recognize how paramount is to correctly set-up and use an auto guiding software, you can find further information and useful tips on this matter in the ONAG®’s user manual.
One fundamental question one should ask, and eventually answer, for astro-photography is how much guiding error is too much?
How much focusing error is too much?
Focusing errors are inevitable, however they can be reduced to a minimum with the correct focus strategy.
One fundamental question one should ask, and eventually answer, for astrophotography is how much focusing error is too much?
From the answer to this question depends grandly the quality of the images. Defocus translates to “fat” stars and larger FWHM, eventually degrading the image resolution.
ONAG® XT CCD/CMOS chip illumination
The ONAG® XT is a heavy duty very rigid and compact minimum back focus on axis guider designed for full frame (24x36mm) chips having 43mm in diagonal.
However the ONAG® XT can easily be used with chips having up to 50mm in diagonal, such as 36x36mm chip formats.
Depending of the optics there may be some vignetting involved with a 50mm diagonal. Nevertheless with most set-ups it is a very small amount, limited to the extreme corners of the image (see plots below), easily removed during flat frame callibration.
SharpLock – A True Real Time Autofocus Solution
Focusing a telescope is a fundamental task for astro-photographic imaging. Maintaining best focus is crucial but over time load transfers due to the mount motion as well as changing temperature often cause a significant change in focus.
Our patent pending SharpLock technology provides better and unique way to deal with focus changes using a true Real Time Auto Focus (RTAF) solution. SharpLock continually monitors and maintains critical focus without any interruptions in imaging operations. There is no longer any need to slew the scope for refocusing.
Introduction to astronomical seeing
Astronomical seeing refers to the blurring of astronomical objects caused by the Earth atmospheric turbulence.
Thermal convection and winds produce turbulence cells having different optical refraction indexes, leading to perturbations and distortions of the incoming light wavefronts.
The seeing conditions from a mathematical and model stand point are described by two fundamental parameters r0 and t0 in the Kolmogorov’s turbulence theory.
It is worth to mention that both t0 and r0 parameters are a function of the wavelength of the light used for imaging, we should come back to this point later. Usually r0 and t0 are given at 550nm for the visible range.